How can you optimize your Zazzle categories so that customers can find and buy your products? It is a question I am frequently asked.
In this article, I will cover 5 ways to optimize my Zazzle categories. It is important to put effort into these small details to make sure that if a customer lands on your Zazzle store page, they will be motivated to continue to shop through your product offerings.
5 Ways to Optimize Your Zazzle Categories – Zazzle Categories Sorting and Browsing Explained
Optimizing your Zazzle categories properly, on your Zazzle storefront, is crucial to helping a customer find the product they want to buy from you.
Pretend you are a customer on Zazzle. You will most likely search for a product via the home page search and look through the popular search results.
However, if you land on a Zazzle storefront homepage of a designer, you want to “see” what you are looking for easily, otherwise, you will quickly move on.
Most people will give you 3 seconds or less on your Zazzle store homepage before moving off of it. If they can’t easily find what they are looking for or are not intrigued to stay and browse, customers, move on.
This article will go over 5 Zazzle tips I use to optimize my Zazzle categories. I find it helps with customer retention, once they land on my Zazzle store homepage.
ZAZZLE CATEGORIES TIP #1:
Displaying Zazzle Categories at the Top of Your Homepage
Zazzle Categories help people navigate your store and find products. You can also use them as a way to promote your product offerings. Make sure you set your store homepage so that the categories show up at the top.
How to set up Zazzle categories to show up first:
Follow these steps to set up categories in Zazzle.
- Open on your Store
- Click on Settings > Advanced Settings > Customize Store
- Set the “Categories” option to the top of the list of the “Visible Sections“.See the image below
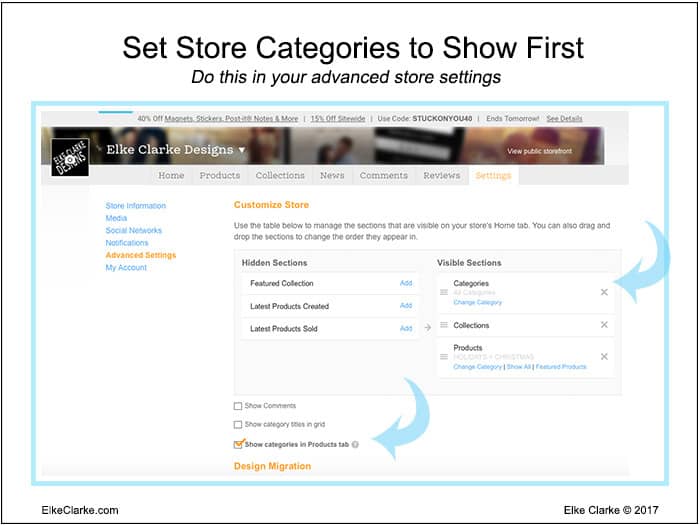
- Tick the box that says “Show categories in Products tab“. That way the categories show on your store’s “home page” and your store’s “products page” in the public view. See the image above.
- Make sure the “Show category titles in the grid” is “OFF” if you have words on your category icon images. See the image above.
ZAZZLE CATEGORIES TIP #2:
Rotate the order and visibility based on the time of year.
If it is summer and the first thing your customer sees in your Zazzle category sections are the categories for Christmas and Valentine’s Day products, they are not going to be as quick to click through, as if you have the “Wedding” or “Fourth of July BBQ” categories at the top of your Zazzle categories.
Take a few minutes each month to switch the order of your categories around to ensure customers “see” what they came to your store for.
How to change the order of the Zazzle categories showing in your store:
Following are the steps to change the order of the Zazzle categories:
- Click on the Store you want to be changed
- Click on the “Products” tab on the store menu bar
- Click the “All Categories” option on the left-hand side.
- Drag and drop the store category icons to change the order. See the image below.
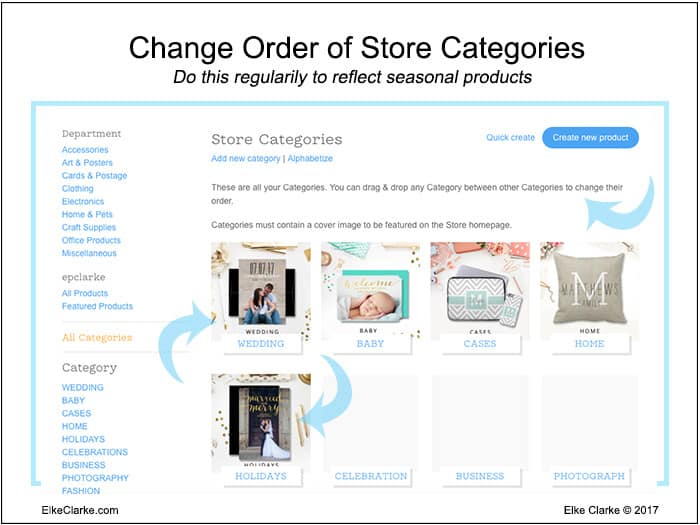
Because it is now February and wedding season, my “Holidays” store category is now in the last position and my “Wedding” store category is in the first position.
ZAZZLE CATEGORIES TIP #3:
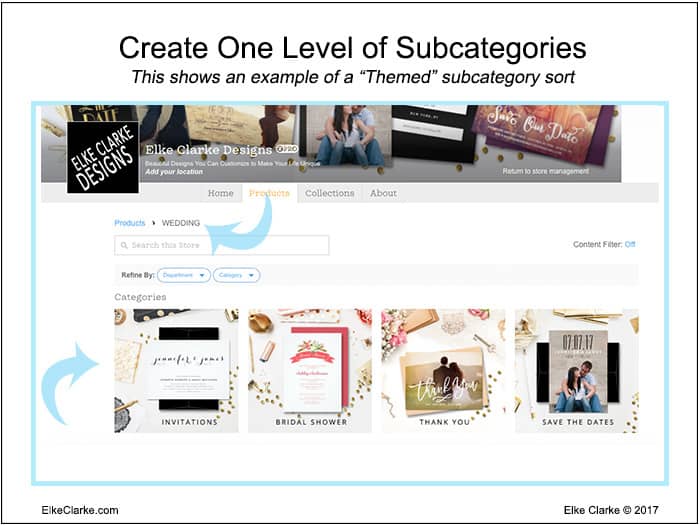
Have Zazzle Subcategories
If you got the customer to click through your first layer of categories, you don’t want them to see a jumble of products. That is why you need at least one layer of Zazzle subcategories.
This can be in the form of a product type sort, color or pattern sort, or further themed sort.
An example of a product sort is:
Category = Baby
Subcategories = Baby Announcements, Baby Home Decor, Baby Clothing
An example of a pattern/color sort is:
Category = Patterns
Subcategories = Chevron, Floral, Stripes
An example of a themed sort is:
Category = Wedding
Subcategories = Invitations, Save the Date, Thank You
An example of a themed category and subcategory sort is shown in the image below:
ZAZZLE CATEGORIES TIP #4:
Have a Maximum of 6 Zazzle Categories Visible
Sometimes you can have too much of a good thing. I would recommend somewhere between 6 to 9 maximum VISIBLE main Zazzle categories.
Why have a maximum of 6 Zazzle Categories?
Customers will give up before getting to your products when they have to scroll through so many categories. Customers made the effort to come to your store. Do not lose them because they have to work too hard to find the product they want to buy.
This does not mean you can not have more than 6 to 9 main categories. You can have as many main categories as you want or need to keep your store organized.
How to add categories in Zazzle properly?
Only add icon images to the main categories you want to have visible on your storefront.
You can see that, in my store, I have more main Zazzle categories than what is visible (see the image below). I just don’t have icons added for the category. Because of that, they do not show up on my Zazzle storefront.
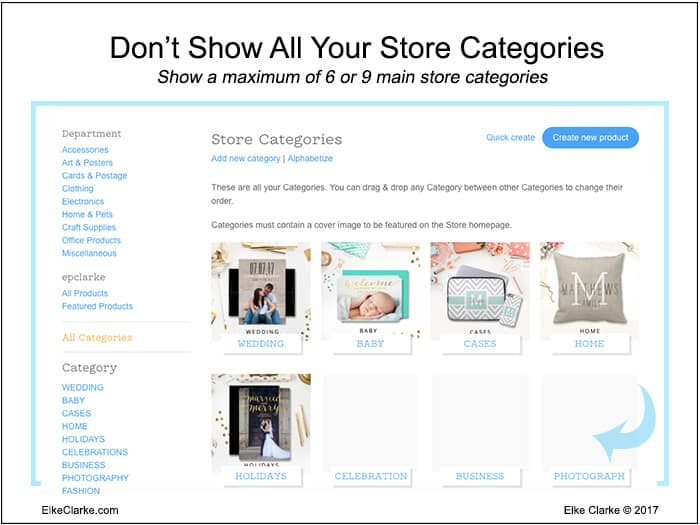
These non-visible categories are still active categories and hold products, which are set to “public view” and are for sale in the marketplace and in my store. They just don’t have the category icon showing.
You just have to remember that when customers come to your store, you don’t want to overwhelm them with every last item you have for sale. Instead, help narrow them down to what they might be looking for.
ZAZZLE CATEGORIES TIP #5:
Use Styled Photography to Create Your Zazzle Category Icons
To create the images for your category icons, pick your most popular selling products or best designs. Then put them into a styled image setting, which best showcases your product.
If you do not have the money to purchase “styled photography”, you can still make some very nice product mockups or simple text boxes in Photoshop.
You can also be creative and take your own photos. But that requires purchasing the products. I am all for NOT SPENDING a great deal of money. So I would not recommend this last option, just to make category icons.
Many styled photography options are now available at reasonable prices.
I would recommend purchasing a limited number of styled photography files for use to create your category icon images.
Bonus Tip: An added bonus is that you can also use them for your media files on your Zazzle store home page.
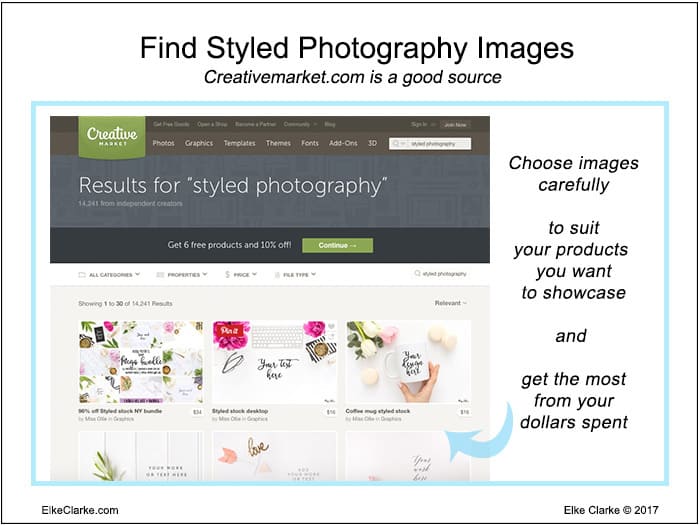
The most popular sources I use for styled photography are:
Search term = “styled photography”.
In the image below, I show you the search results on Creative Market for “styled photography”.
Zazzle Tips – Purchasing Tips for Zazzle Products:
- Opt for a few scenes that suit your product color schemes and product types that you want to showcase.
- Make sure the photos are flexible enough to use in more than one store category without looking the same each time.
- Keep to a minimal budget. It is only your Zazzle categories! Don’t overspend!
- Then, if possible, try to find new and different backgrounds other than what other store owners are already using on Zazzle
How do I make my Zazzle store category images with styled photography?
- Create a graphics file 324 x 324 pixels in size at 72 dpi.
- Screenshot the product you want to be showcased and add it to your graphics file.
- Manipulate the size etc to make it look good on the background of the styled photo you purchased.
- Add a drop shadow and play with the image of your product to make it look like it fits with the background items.
- Add text onto your image matching the category name
- Once you are done, save it as a “png” or “save for web jpeg format” before uploading.
- Add your completed icon image by choosing “edit” under the category you want in the “products” page in your “store management” view.
Conclusion:
What 5 tips did you learn in this article about Zazzle categories?
- Show your Zazzle categories on your home page at the top and on the product page
- Rotate the order and visibility of the Zazzle categories based on the time of year.
- Have one level of Zazzle Store Subcategories
- Have a Maximum of 6 Zazzle Categories and Subcategories Visible
- Use Styled Photography to Create Professional-Looking Zazzle Category Icons
Love this article and want to work with Jen and Elke Clarke in their coaching program, The Profit by Design Academy® Click the link to find out more
More Resources on Zazzle Categories:
9 replies to "5 Ways to Optimize Your Zazzle Store Categories"
Looking forward to your advanced course. Any idea when it will become available?
Thanks for this article. It inspired me to finally spend some time on this & I never even gave any thought to sub-categories before!
I just updated my categories & created some better graphics for them, then I got some suggestions on the Zazzle forum & I was wondering what you’re thought was on this. This person suggested that unless you are getting a good amount of direct traffic to you store, then people are going to find your products via the home page only & thus spending much effort setting up categories is maybe not worth the time.
Do you have in mind only sellers who are already generating a lot of direct traffic to their shops to spend a lot of time with styled images etc. for categories or do you think it’s also useful to the rest of us who don’t yet have a lot of direct traffic?
Do you recommend product specific or design-specific categories? It appears your examples are more product specific. I was thinking that the way I would rather shop is thorough product categories, but then again if I went to someones store & saw a pretty pink elephant pillow, loved the design but wanted the pink elephant on a mug, it might be hard to find it unless they were organized by designs. Any thoughts on this? Thanks!!
Good points! I guess a small amount of traffic or customers shouldn’t be discounted. It’s a start. That’s a much more productive way of thinking about it.
Thanks Elke!!
My subcategories do not appear on my shop when I click on the category. Can you explain how you add subcategories and make them public?
I cant find HOW TO add image icon to my store subcategories??? Also so time consuming to post everyday to social media, there is hardly any time to create, is there is better way?
Cant get W-8BEN correctly filled out either, again returned for revision??? I live in Toronto, any help, greatly appreciated!
Thank you for sharing, may many blessing be upon you and yours
Thanks for the tips Elke! Just wondering if you could let me know how I can show more that 3 categories on my homepage? I have at least 4 but they are just not showing up. Do I need to wait 24 hours before everything kicks in? I’m coming from etsy and it’s a lot more user friendly or maybe I’m just not used to the user interface! Thanks in advance!
I want to say thank you for this information. I left zazzle for a long time out of stagnancy. Your information can revive me to start again.
Thank you so much for this article. I’m new to Zazzle and being it’s not very user friendly (IMHO), I was glad to find you and your YouTube channel as well. I’ve only got a couple of things in my store so it’s nice to be able to start out on the right foot. Thank you!
Lisa, you are welcome. I am glad I can help you. Keep me posted how you are doing on Zazzle.